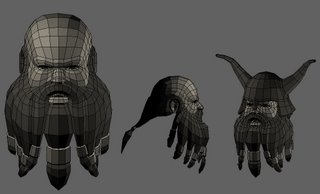
I decided to model a dwarf's head for this walkthrough, which has been significantly inspired by the warhammer universe. I used to paint the mintures a long long time ago and its been something i've wanted to model for ages now so here goes. So far I've really only roughed out proportions and i've tried to keep the polys flowing in the form of the muscles and direction of the hair whilst maintaing mostly quads. The reason im sticking to quads for now is that im about to detail him up in zbrush, and zbrush desciminates against triangles, areas with triangles tend to pinch badly after subdivsion. Im not keeping quads for ingame use at all (although for areas of extreme deformation its probably best-i.e. elbows, knees and shoulders and the mouth area and eyes on the face) as the engine with most likely triangulate meshes anyways.
I constructed the low poly head in 3DS Max using edit poly. I generally start with the eye area and work out from there (see the very popular Joan of Arc tutorial by Michel Roger for a detailed and thorough explanation of this, 3d total have a good translation), building strips of polygons and connecting them up and afterwards adjusting the polygons so they flow correctly. I'm not really going to spend much time detailing this process if you would like to know more about basic modelling techniques head over to subD modelling and in particular check out the modelling primer, although mainly for high poly models the techniques used can be adapted for game models, the same principles apply.y
In 3ds Max I have several customisations to speed up my workflow. One of the things I use very often is sliding verts along the edges they are connected to. This is extremely useful for adjusting polygon flow after you have roughed out a model. I have this setup up to shift+x as a keyboard shortcut (it might even be setup this way be default if I remember correctly) the only downside of using his command is that there is no visual indicator to tell you its active, so if you forget that it is on the you may start accidentally moving verts along edges instead of in normal 3d space-a tiny inconvenience. I also use the bridge command a lot to connect up polys, I have this shortcut to the b key. Target weld verts is set to t (ctrl+t is default) and the most useful shortcut of all is setting collapse to c. I use collapse all the time to join verts, edges and faces when modelling and retopologising areas of the mesh. This comes in especially useful when used along side the edge loop and edge ring commands (get those bound to keys like alt+e and alt+r for efficiency) and can speed up tedious tasks like creating LODs. The only other tool i use quite a lot is the paint selection tool along with ignore backfaces turned on. This is a great way to select awkward areas of the mesh where box select becomes cumbersome. I have this set to shift-q and box select set to ctrl+q.
Next up is UVs for the low poly model.
Edit>After looking at the model again the beard is waay too small....some soft selecting will sort that out! Will update with UVs soon.
No comments:
Post a Comment