
Friday, September 29, 2006
Evil Ryu
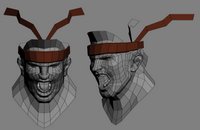
The tutorial is on hold for a short while. I've been side tracked with stuff at home and also the new polycount challenge. I decided to have a crack at modelling Evil Ryu, I doubt i'll get the whole model finished in time for the contest deadline but I should at least have a finished bust. I started roughing out the model yesterday, don't have a clue what im going to do with the hair...
Thursday, September 14, 2006
More UVs
In these steps I will stop using symmetery, lay out the uvs unflipped, and begin to resize and fit in the uv elements.
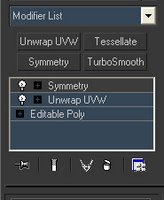
Right click on the UVW Unwrap modifier in the stack and select collapse to (if it does nothing hit ctrl+s and try again, seems to be a bug). Now apply another UVW modifier above the symmetery modeifer in the stack. This modifier can now be used flip the mirrored UVs so the the checker pattern reads from left to right all the way across the model and the numbers on the checker are not back to front, flipped or upside down. Quickest way to do that is to box select all the faces left of the centre line of the model in the front view and then in the UV edit window flip horizontally (I have this bound to shift+f, alt+f for a vertical flip). Then move the UV elements together and weld the corresponding verts down the centre of the face (and beard). You can do this with all the parts that were mirrored down thier centre, like so....
Also if your UVs are getting in the way and would like to move them 1 square left pixel perfect then click the little icon at the bottom left as shown and enter a value of 1 in, to move it back change it back to 0. This can come in useful when your using polygroups in zbrush but more on that later!
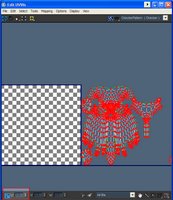
So thats the uvs laid out kindof, they could be making better use of the space and arranged a little better. I also need to get the eyes mouth and teeth in there too. But thats all for today.

Right click on the UVW Unwrap modifier in the stack and select collapse to (if it does nothing hit ctrl+s and try again, seems to be a bug). Now apply another UVW modifier above the symmetery modeifer in the stack. This modifier can now be used flip the mirrored UVs so the the checker pattern reads from left to right all the way across the model and the numbers on the checker are not back to front, flipped or upside down. Quickest way to do that is to box select all the faces left of the centre line of the model in the front view and then in the UV edit window flip horizontally (I have this bound to shift+f, alt+f for a vertical flip). Then move the UV elements together and weld the corresponding verts down the centre of the face (and beard). You can do this with all the parts that were mirrored down thier centre, like so....

Also if your UVs are getting in the way and would like to move them 1 square left pixel perfect then click the little icon at the bottom left as shown and enter a value of 1 in, to move it back change it back to 0. This can come in useful when your using polygroups in zbrush but more on that later!

So thats the uvs laid out kindof, they could be making better use of the space and arranged a little better. I also need to get the eyes mouth and teeth in there too. But thats all for today.
Tuesday, September 12, 2006
UVs Step 1
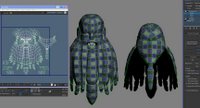
Here's the UV layout so far.
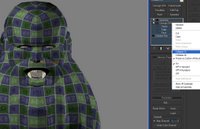
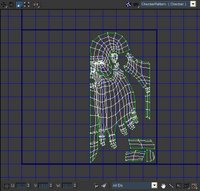 What I've got here is a very basic first pass on the UVs. I've been modelling so far with the symmetry modifier above edit poly in the stack. This gives me a quick preview of what the mesh will look like after its copied and flippped. Just be sure to turn off the "show cage option" in edit poly under Subdivision Surface...can't see a damn thing with it on. And also be aware of the the show end result toggle button which looks a little bit like a test tube right under the stack in the command panel. I want to keep the symmetry active when im uv mapping so I apply the unwrap uvw modifier inbetween the edit poly and symmery modifiers like so. You can turn off symmetry by clicking the light bulb icon to the left of the modifier. Be sure to also apply a nice checker texture to the model to easily check for distortion and flipped UVs etc, Steffen 'Neox' Unger has a great little checker download it here and have a look at his excellent blog here.
 I then selected regions of the mesh using face selections either directly on the 3d model in the viewport, or in the UV editor window (hit the EDIT button in the UVW unwrap command panel). Try to select regions where a natural seem occurs, like a seam on cloths where the garment has been stitched together, in between two different garments/materials or even a seam between hair and skin (although the latter isn't a great example and should be avoided if at all possible). Once I've selected a region I hit the Planer button and unclick Normalize Map.
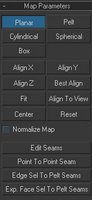 Make sure you deselect the planer button and then select either best align or an appropriate axis (x,y,z) after it has planer mapped your selection (this happens to be one of THE most annoying things about mapping in max currently, why the hell it doesn't just click once like every other button is a mystery).
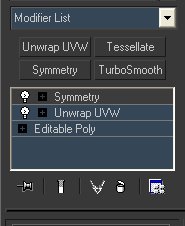
Now relax the element by selecting the relax tool from the UV edit window menu like so...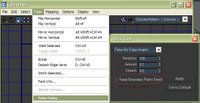
You can toggle on keep boundary points fixed to keep your edges free from getting relaxed. This is useful for areas like the eye and mouth and the centre line of the head if you are using symmetry.
Move the planer mapped element out of the way for the moment and move onto the next piece. If you like keyboard shortcuts for everything like me you will have to manually setup keys for the Unwrap UVW modifier as it doesn't match up with edit poly shortcuts by default. I usually stitch together elements maually using the target weld uv tool (shortcut to t) but this is because most of the global weld functions cause problems with the scale I have to work with.
That pretty much brings us to the first image, I'll continue on with this tomorrow.
 What I've got here is a very basic first pass on the UVs. I've been modelling so far with the symmetry modifier above edit poly in the stack. This gives me a quick preview of what the mesh will look like after its copied and flippped. Just be sure to turn off the "show cage option" in edit poly under Subdivision Surface...can't see a damn thing with it on. And also be aware of the the show end result toggle button which looks a little bit like a test tube right under the stack in the command panel. I want to keep the symmetry active when im uv mapping so I apply the unwrap uvw modifier inbetween the edit poly and symmery modifiers like so. You can turn off symmetry by clicking the light bulb icon to the left of the modifier. Be sure to also apply a nice checker texture to the model to easily check for distortion and flipped UVs etc, Steffen 'Neox' Unger has a great little checker download it here and have a look at his excellent blog here.
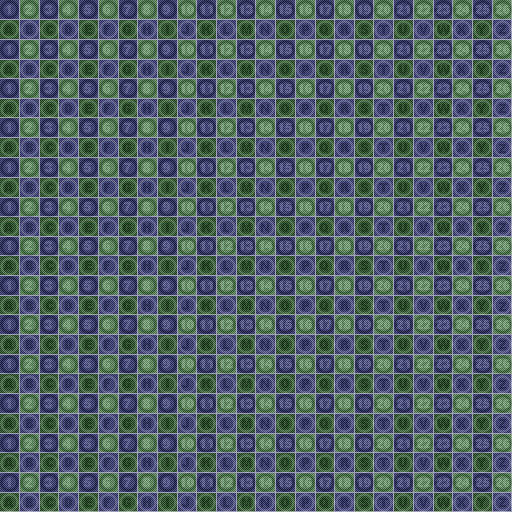
 I then selected regions of the mesh using face selections either directly on the 3d model in the viewport, or in the UV editor window (hit the EDIT button in the UVW unwrap command panel). Try to select regions where a natural seem occurs, like a seam on cloths where the garment has been stitched together, in between two different garments/materials or even a seam between hair and skin (although the latter isn't a great example and should be avoided if at all possible). Once I've selected a region I hit the Planer button and unclick Normalize Map.
 Make sure you deselect the planer button and then select either best align or an appropriate axis (x,y,z) after it has planer mapped your selection (this happens to be one of THE most annoying things about mapping in max currently, why the hell it doesn't just click once like every other button is a mystery).
Now relax the element by selecting the relax tool from the UV edit window menu like so...
You can toggle on keep boundary points fixed to keep your edges free from getting relaxed. This is useful for areas like the eye and mouth and the centre line of the head if you are using symmetry.
Move the planer mapped element out of the way for the moment and move onto the next piece. If you like keyboard shortcuts for everything like me you will have to manually setup keys for the Unwrap UVW modifier as it doesn't match up with edit poly shortcuts by default. I usually stitch together elements maually using the target weld uv tool (shortcut to t) but this is because most of the global weld functions cause problems with the scale I have to work with.
That pretty much brings us to the first image, I'll continue on with this tomorrow.
No UVs yet!

Unfortunately I didn't have time to do the UVs last night, I was having too much fun grouting the bathroom floor. But I did play around with the model a wee bit more so here is a crappy mini update. I lobbed in some teeth from an old model, I think there are probably about 1.8 million polys right now but rest assured they will be substituted for something slightly more sensible! Mashed the beard and the mouth around a little to give him a little bit more character, the eye area is also looking dull so I might revisit that too. But first UVs! I shall do them asap.
Also be sure to check out Rick Stirling's blog. He's pretty much an expert in everything...yes everything. Quick click here.
Monday, September 11, 2006
Max UI
For the sake of completeness I've uploaded my Max User Interface which has all my keyboard preferences. If you have any tips or better methods than those I've suggested feel free to leave them in the comments.
Download the UI here.
Thats all for now, if I get 5 minutes tonight I'll do a bit UV mapping on the dwarf.
Download the UI here.
Thats all for now, if I get 5 minutes tonight I'll do a bit UV mapping on the dwarf.
Saturday, September 09, 2006
Step 1 - Lowpoly

I decided to model a dwarf's head for this walkthrough, which has been significantly inspired by the warhammer universe. I used to paint the mintures a long long time ago and its been something i've wanted to model for ages now so here goes. So far I've really only roughed out proportions and i've tried to keep the polys flowing in the form of the muscles and direction of the hair whilst maintaing mostly quads. The reason im sticking to quads for now is that im about to detail him up in zbrush, and zbrush desciminates against triangles, areas with triangles tend to pinch badly after subdivsion. Im not keeping quads for ingame use at all (although for areas of extreme deformation its probably best-i.e. elbows, knees and shoulders and the mouth area and eyes on the face) as the engine with most likely triangulate meshes anyways.
I constructed the low poly head in 3DS Max using edit poly. I generally start with the eye area and work out from there (see the very popular Joan of Arc tutorial by Michel Roger for a detailed and thorough explanation of this, 3d total have a good translation), building strips of polygons and connecting them up and afterwards adjusting the polygons so they flow correctly. I'm not really going to spend much time detailing this process if you would like to know more about basic modelling techniques head over to subD modelling and in particular check out the modelling primer, although mainly for high poly models the techniques used can be adapted for game models, the same principles apply.y
In 3ds Max I have several customisations to speed up my workflow. One of the things I use very often is sliding verts along the edges they are connected to. This is extremely useful for adjusting polygon flow after you have roughed out a model. I have this setup up to shift+x as a keyboard shortcut (it might even be setup this way be default if I remember correctly) the only downside of using his command is that there is no visual indicator to tell you its active, so if you forget that it is on the you may start accidentally moving verts along edges instead of in normal 3d space-a tiny inconvenience. I also use the bridge command a lot to connect up polys, I have this shortcut to the b key. Target weld verts is set to t (ctrl+t is default) and the most useful shortcut of all is setting collapse to c. I use collapse all the time to join verts, edges and faces when modelling and retopologising areas of the mesh. This comes in especially useful when used along side the edge loop and edge ring commands (get those bound to keys like alt+e and alt+r for efficiency) and can speed up tedious tasks like creating LODs. The only other tool i use quite a lot is the paint selection tool along with ignore backfaces turned on. This is a great way to select awkward areas of the mesh where box select becomes cumbersome. I have this set to shift-q and box select set to ctrl+q.
Next up is UVs for the low poly model.
Edit>After looking at the model again the beard is waay too small....some soft selecting will sort that out! Will update with UVs soon.
Wednesday, September 06, 2006
Zbrush UI
Over the next few weeks I am going to try and do a step by step walkthrough on creating a character for a game. It's going to be pretty quick and dirty but will hopefully show a few tips I've picked up recently. Most of the stuff in the walkthrough will be techniques posted around the CG community websites, but with this one they will focus on a realtime character.
So to kick off I've posted up my custom ZBrush user interface for you to try out. It only has the tools and functions I most often use for realtime character creation, which should be a fair bit more streamlined than the usual clutter you have to sift through. To use this you will also need the ZMapper plugin and I the hotkey editor too. You can find both of these over at www.zbrushcental.com. The .CFG file gets copied to C:\Program Files\Pixologic\ZBrush2. Backup your own Custom UI first if you have one.
The only other major tool I use not on the side panel of the UI is smart resym, but only because I haven't figured out how to get it over there. Instead I access this normally by going through the Tool>Deformation menu. If you know a way of doing this feel free to let me know in the comments. You can always switch back the normal layout by hitting the Standard button at the top right if my UI is missing something you use.
Next up will be the low poly Head in max.
Click Here to download the Zbrush UI
Tuesday, September 05, 2006
Ye old model
To get the ball rolling here is an old model I started when I was travelling through to edinburgh every day for a few months. I never got round to finishing it, but it has since been worked on. I'll hopefully post some further progress on it soon.
Monday, September 04, 2006
Let the blogging commece
Finally managed to get this blog up and running after various acts of witchcraft. I'm hoping to use this blog as a testing ground for portfolio material which will eventually appear on my website (once I get a web provider sorted) and also to share some techniques and methods I've picked up over the years. Updates probably won't be all that often at least until I get finished with house renovations. Thanks to my good mate Stewart Wright for helping me out with the blog, you can visit his blog by clicking on the link stoot. Oh and no laughing at my gamerscore, don't have much time to play new 360 games especially with Res4 and Halo2 still keeping me occupied.
Subscribe to:
Posts (Atom)