Tuesday, December 18, 2007
Roll
I've been fighting with zbrush for a while now trying to get the mysterious roller brush to work. The idea is that you can roll on alpha brushes like you would use a roller brush with paint on your walls at home. This is perfect for doing fabrics, skin pores and all kinds of cool stuff. Thing is i couldn't bloody do it. As it turns out it wasn't the roller brush i was after at all, but a little button in the stroke menu "roll" which modifies your current stroke (dots and freehand work). So bloody obvious! Works outside of projection master too.


Wednesday, December 12, 2007
Straps and shaders


A little more work on the straps, knee pads and little bits n pieces. Think I'll start on the lowpoly version soon.
Tuesday, December 11, 2007
Pores n stuff

Started adding some micro details using alphas and projection master, and other stuff like eye lashes that you'll probably never ever, see. Good fun though! I updated the hair a bit as well, used clay tubes to give it more volume although I'm still not happy with it.
Monday, December 03, 2007
Import Groups
When importing a subtool that was generated from an extract in zbrush, keep the groups boxes ticked in the option box in max. If you keep your settings as shown, you will get the outside section of the mesh, the inside, and the edge section as well. This is particularly useful if your mesh is very dense, you can select the inside section and delete, saving almost half the polys.


Friday, November 23, 2007
AO with MR

I really liked the results from an ambient occlusion bake with mental ray in 3DSMax, but I always got loads of errors (black splodges). Turns out that this is the low poly mesh intersecting with the high poly mesh, for some reason Mental Ray isn't able to hide the low poly mesh its baking to. So to get around this after you set up the projection cage simply go down the stack into edit poly, select all the faces and then select hide (not the hide command for objects, but the hide button in edit poly), this will hide all the faces of the model. Go back up the stack to the projection modifier and you'll see the cage again. Hit bake and you'll get a nice AO map without the black areas. Here's some settings I've found useful when doing this. The higher spread seems to bake a cavity style map rather than AO which can be very useful. (I'll post an example soon). The memory spinner will need to be increased if you have brought in a very high poly mesh from zbrush (as an .obj) and your getting an error when baking. I usually increase it to 3000MB and don't seem to get an memory errors.

Thursday, November 22, 2007
Hard Surface Texturing
Stefan-Morrell has posted a very nice tutorial on how to texture hard surfaces in photoshop over on CGSociety. Not directly character related but this kind of stuff can come in really handy when doing armour etc.
Click here for the tutorial
Click here for the tutorial
Print Screen
Recently I've had trouble doing a print screen into Photoshop. I tried all the usual clear clipboard stuff but it never worked. This did though:
click here
click here
Wednesday, November 21, 2007
Speed = No UVs
At least it does in zbrush:
http://www.pixologic.com/docs/index.php/Deleting_Your_UVs
Apparently it speeds up sculpting.
http://www.pixologic.com/docs/index.php/Deleting_Your_UVs
Apparently it speeds up sculpting.
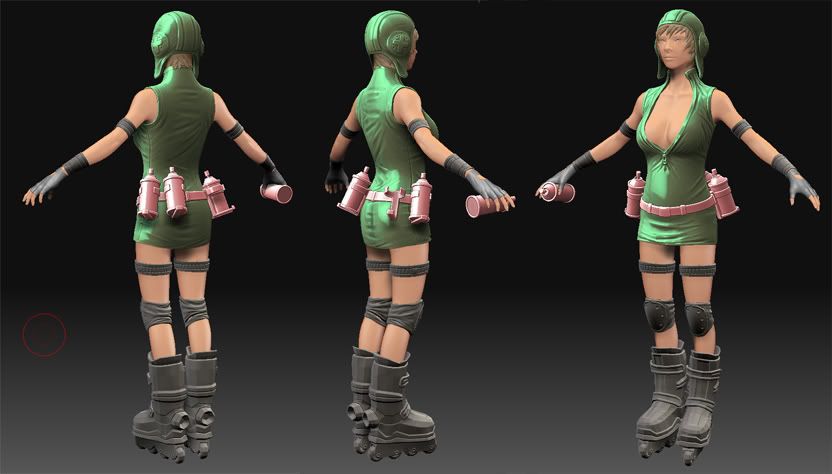
Character Sheet
 Quick zbrush tip to quickly create orthographic and perspective renders. Align the camera to front view (use shift+left click drag). Click Document>Zapplink Properties, then click the front button. Do the same for the right view. Then approximate a 3/4 view and click custom. Then simply hit "Make Character Sheet" and zbrush will punt out multiple views of your character to photoshop. It uses 2 separate layers too, so you can composite your character into a different background. You should get an image like the one below.
Zbrushed Dwarf

Not very far on with the zbrushing of this guy, he's got way too many parts. Started the guantlets, cloth, boots and the leather apron. The beard and head are just about done, the little metal hair thingys havent been touched though.
Tuesday, November 20, 2007
Gimbal Lock is back
 Progess is verrry slooow, but he's still going. A wee bit of texture work shown here, some pics of zbrush work to follow...

Wednesday, March 07, 2007

Head AO and Normals
I did a quick first pass in zbrush on the head, after I was done sculpting the pain began. Firstly I made the critical mistake of missing a few stray polys when I was unwrapping the head which zbrush doesn't like. So when it came to rendering the normals in zbrush (which I usually do to save having to export silly poly counts in and out of 3ds Max) zmapper popped that infuriating screen that doesn't actually tell you what you've done wrong nor lets you know that anything is indeed wrong...I'll post the most annoying error screen in the world later. SO i investigated in Max, found the offending polys and then tried to use zbrushes import function so it would use the new UV's...but of course zbrush wasn't happy. Seems I messed something up with the import/export settings. I didn't want to lose the work I had done on the head so I started looking at other solutions (baking the normals in max not only took forever but the results were bloody crap) and then I remembered xNormal, which I first found on the polycount boards
Jogshy has produced an incredible program, it managed to load my +1million poly object so fast I wondered whether it worked at all. It had, and it then calculated my normal and AO maps in a flash. I had some small problems with banding in the AO maps but it does it job fine for now, I'll need to tweak and play with it some more. xNormal is also a model viewer that allows you to preview your work with normal maps, lights and stencil shadows. A truly excellent little program.
Here are some quick shots of the AO from the high poly sculpt and a couple of zbrush renders. The metal tassels on the bottom of the beard are going to be made in max using sub-d techniques, so ignore those blank areas on the sculpt for now, and teeth will be added in later also.


Realign Symmetry tip

To speed up my workflow in zbrush I usually use Realign Symmetry function after working on one half of the mesh. This allows me to hide lots of unnecessary polys speeding up viewport performance. There are however a few tricks to make sure you end up with a clean mesh in the end. As the image above shows instead of simply applying your realign symmetry to the final subdivision (level 6 in my case here) apply it on every sub divisional level starting with the lowest. This can take a while but the results are worth it, you should end up with a seam free mirror of your sculpt. If you don't do this chances are you will get an ugly seam which will be a total pain to get rid of.
Quick AO render
 I was trying out Faogen and decided to quickly render out some ao maps for Gimbal...which was a little pointless without smoothing groups etc, but I couldn't help myself. Faogen seems really nice too, I'll put it through its paces with some high poly stuff later..
Saturday, March 03, 2007
Gimbal Lock

Haven't had much time recently to update the blog or do anything outside of work. I somehow managed to squeeze out this guy after getting some unexpected free time last weekend. I've been zbrushing the head now and unwrapping the rest of his body, so the next update should be just round the corner. Thanks to Erik, the dwarf is now called Gimbal Lock!
Subscribe to:
Posts (Atom)